
Mastering NameServers, DNS Records, dns server and Cloudflare: A Comprehensive Guide to Seamless Hosting and Domain Integration for SEO and Security
In the dynamic world of digital marketing, staying ahead of the competition requires a deep understanding of SEO (Search Engine Optimization) strategies and website security. A crucial aspect of this is mastering NameServers, DNS records, and harnessing the power of services like Cloudflare for enhanced security and SSL (Secure Sockets Layer) implementation. This comprehensive guide will take you through the intricacies of connecting hosting and domains from different vendors, setting up DNS records, and leveraging Cloudflare for SEO and security benefits.
How to Create a Website
1. Understanding the Basics
1.1 What Are NameServers?
NameServers, often referred to as DNS (Domain Name System) servers, are a fundamental component of the internet. They translate human-friendly domain names (e.g., example.com) into machine-readable IP addresses (e.g., 192.168.1.1), allowing computers to locate and communicate with each other across the web.
NameServers play a pivotal role in directing web traffic. Think of them as the internet’s equivalent of a telephone directory. When someone types your website’s name into their browser, the NameServer provides the exact IP address for that domain.
1.2 The Significance of DNS Records
DNS records are the building blocks of the DNS system, containing vital information about a domain. These records include A records (for pointing to IP addresses), CNAME records (for aliasing domains), MX records (for email routing), and more. Understanding and configuring DNS records correctly is critical for SEO and security.
Domain Name System (DNS) records are essentially a roadmap for how the internet should navigate your website. Each type of DNS record serves a specific function:
- A Record: Directs your domain to an IP address.
- CNAME Record: Points your domain or subdomain to another domain name.
- MX Record: Manages where your emails should be delivered.
- TXT Record: Provides information to outside sources about your domain.
In today’s digital era, having an online presence is more crucial than ever. If you’ve ever pondered how to create a website step by step, then this comprehensive guide will lead you through every facet – from DNS records and NameServers to ensuring your site remains a fortress against hackers. Let’s dive in.
2. Selecting the Right Hosting and Domain Providers
2.1 Assessing Hosting Providers
Choosing the right hosting provider impacts website performance and SEO. Evaluate factors like server speed, uptime guarantees, and support for SEO-friendly features like CDN (Content Delivery Network) integration.
2.2 Evaluating Domain Registrars
Selecting a reliable domain registrar ensures seamless domain management. Look for registrars with user-friendly interfaces, competitive pricing, and excellent customer support.
2.3 Cross-Vendor Hosting and Domain Integration
When your hosting and domain come from different vendors, coordination is essential. Configure DNS records to point to your hosting provider’s servers and ensure they match your domain registrar’s settings.
2. Connecting Hosting and Domain from Different Vendors
Many often wonder if it’s possible to buy a domain from one provider and hosting from another. The answer is a resounding yes.
Step-by-step guide on how to create a website with separate domain and hosting providers:
- Purchase Your Domain and Hosting: Begin by purchasing your domain and hosting from your preferred vendors.
- Find Your Hosting NameServers: Login to your hosting account. Navigate to the account details or settings page. Here, you should find the NameServers details (typically it starts with ‘ns1’ and ‘ns2’).
- Update Your Domain’s NameServers: Go to your domain registrar’s dashboard. Navigate to the domains section and select your domain. Update the NameServers with the ones provided by your hosting company.
3. Setting Up NameServers and DNS Records
3.1 Configuring NameServers
Follow the hosting provider’s instructions to configure your domain’s NameServers. This step is crucial for associating your domain with your hosting account.
3.2 DNS Record Types
Learn about different DNS record types, including A, CNAME, MX, TXT, and more. Each serves a unique purpose, so configure them according to your website’s needs.
Below is a breakdown of common domain (DNS) records and their purposes:
- A Record (Address Record):
- Purpose: Points a domain or subdomain to an IPv4 address.
- Example: Directing yourwebsite.com to the IP address 192.168.1.1.
- AAAA Record (Quad-A Record):
- Purpose: Points a domain or subdomain to an IPv6 address.
- Example: Directing yourwebsite.com to an IPv6 address.
- CNAME Record (Canonical Name Record):
- Purpose: Maps one domain name to another. It allows you to alias a domain to another domain.
- Example: Directing www.yourwebsite.com to yourwebsite.com.
- MX Record (Mail Exchange Record):
- Purpose: Specifies the mail server responsible for accepting email messages for a domain.
- Example: Directing email sent to your domain to a specific mail server like mail.yourwebsite.com.
- TXT Record (Text Record):
- Purpose: Provides text information to sources outside your domain. Commonly used for verification purposes, SPF records, and DKIM.
- Example: Verifying domain ownership for Google Search Console.
- SRV Record (Service Record):
- Purpose: Specifies information about available services under a domain. Often used for services like Microsoft’s Office 365 or SIP configurations.
- Example: Directing specific services for a domain to a target domain and port number.
- NS Record (Name Server Record):
- Purpose: Specifies the authoritative name servers for the domain.
- Example: Pointing your domain to a specific set of name servers like ns1.hostingcompany.com and ns2.hostingcompany.com.
- PTR Record (Pointer Record):
- Purpose: Used for reverse DNS lookup. Allows the DNS to provide an IP address and receive a domain name.
- Example: Resolving the IP address 192.168.1.1 to yourwebsite.com.
- SOA Record (Start of Authority Record):
- Purpose: Provides authoritative information about a domain, including primary name server, the email of the domain administrator, domain serial number, and several timers relating to refreshing the zone.
- Example: Contains details for how the rest of the domain records are managed.
- CAA Record (Certification Authority Authorization):
- Purpose: Specifies which certificate authorities (CAs) are allowed to issue SSL/TLS certificates for a domain.
- Example: Dictating that only a specific CA can issue certificates for yourwebsite.com.
Each DNS record has its unique properties and functionalities, ensuring that internet traffic is directed correctly and efficiently. Regularly checking and managing these records is essential for maintaining the proper operation and security of a domain.
3.3 Essential DNS Records for SEO
Optimize your DNS records for SEO by setting up essential records such as A records for your website, CNAME records for subdomains, and MX records for email services.
4. Migrating Domains and Hosting
4.1 Pre-Migration Preparation
Before migrating, backup your website, database, and DNS records. Notify search engines of the upcoming move and ensure your new hosting environment is ready.
4.2 The Migration Process
Follow a step-by-step migration plan, including changing NameServers, moving website files, and updating DNS records. Test your website thoroughly after the migration.
4.3 Post-Migration SEO Considerations
Monitor your website’s performance post-migration. Address any issues promptly and update any hardcoded links or references.
5. Setting up Cloudflare for SSL and Enhanced Security
Cloudflare offers a fantastic solution for those pondering how to make a website secure for free. Not only does it provide a free SSL certificate ensuring your website runs with HTTPS, but it also offers enhanced security against DDoS attacks.
How to Install Free SSL Certificate for Lifetime Cloudflare
Steps to set up Cloudflare:
- Sign Up: Create a free account on Cloudflare.
- Add Your Website: Input your site’s domain. Cloudflare will automatically retrieve your DNS records.
- Update NameServers: Replace your current NameServers (from your domain registrar) with the ones provided by Cloudflare.
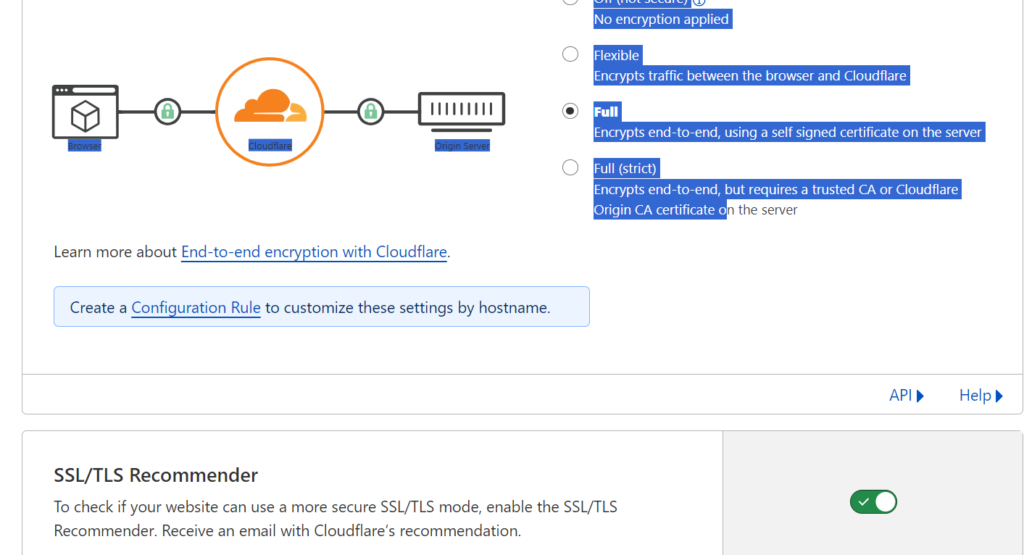
- Enable SSL: Navigate to the SSL/TLS section in Cloudflare and ensure it’s set to ‘Flexible’ or ‘Full’ based on your preference.
5.1 Introduction to Cloudflare
Cloudflare is a powerful CDN and security service. It sits between your website and visitors, optimizing content delivery and providing protection against cyber threats.
5.2 Setting Up Cloudflare for Your Domain
Integrate Cloudflare with your domain by changing the NameServers to point to Cloudflare’s servers. Configure security settings and leverage caching for SEO benefits.
5.3 Leveraging Cloudflare for SEO Benefits
Cloudflare’s CDN speeds up content delivery, improving page load times—a crucial factor for SEO. Additionally, its security features protect against DDoS attacks and threats that could harm SEO rankings.
5.4 Cloudflare’s SSL Integration
Implementing SSL through Cloudflare is seamless and free. It ensures secure data transfer, positively impacting SEO rankings as search engines prioritize secure websites.
6. Optimizing SEO with Your New Setup
6.1 Page Load Speed
Faster-loading websites rank higher. Use tools like Google PageSpeed Insights to identify and address performance issues.
6.2 SSL and HTTPS for SEO
Google favors HTTPS websites. Ensure SSL is correctly configured and monitor for any issues.
6.3 Mobile Friendliness
Responsive design is critical as mobile-friendliness affects search rankings. Test your site’s mobile usability regularly.
6.4 SEO Audit and Monitoring Tools
Utilize SEO tools like Google Analytics, Google Search Console, and third-party tools to continually audit and monitor your website’s SEO performance.
7. Ensuring Ongoing SEO Success
7.1 Regular SEO Audits
Regularly perform SEO audits to identify and address issues. Monitor keyword rankings, backlinks, and website health.
7.2 Monitoring DNS Records
Keep an eye on your DNS records to ensure they remain correctly configured. Any changes should align with your SEO strategy.
7.3 Cloudflare Security Monitoring
Cloudflare provides security reports. Regularly review these reports to detect and mitigate potential threats.
Fix this site can’t be reached or IP address could not be found error
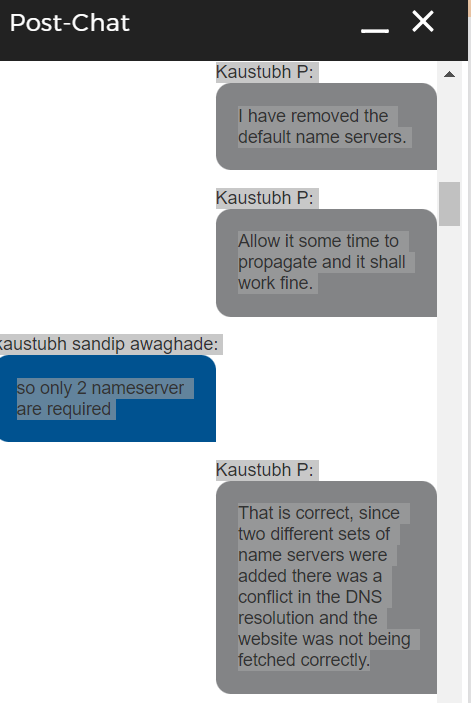
Below are the chat with the support team of the domain :-
I could see that the Name Servers have been added incorrectly.
verify here your Name Servers https://dnschecker.org/#NS
I have removed the default name servers.
Allow it some time to propagate and it shall work fine.
so only 2 nameserver are required
That is correct, since two different sets of name servers were added there was a conflict in the DNS resolution and the website was not being fetched correctly.
Your website shall be fetched accordingly.
8. Conclusion
Mastering NameServers, DNS records, and Cloudflare integration is pivotal for enhancing SEO and ensuring website security. By selecting the right hosting and domain providers, configuring DNS records effectively, and harnessing the power of Cloudflare, you can optimize your website for search engines and protect it from online threats, ultimately improving your online presence and user experience. Stay vigilant, monitor your setup, and keep up with SEO best practices to ensure ongoing success in the ever-evolving digital landscape.
Transitioning towards the end, securing your website is a continuous process, not a one-time setup. Regular audits, staying updated with the latest threats, and proactive measures are essential in ensuring your site remains safe. By integrating services like Cloudflare and being vigilant about updates and potential vulnerabilities, you put yourself in a prime position against potential online threats.
In conclusion, the world of NameServers, DNS records, and website security might initially seem daunting. However, with the right guidance, tools, and mindset, anyone can establish a secure and robust online presence. Remember, the key is to stay informed and always prioritize your site’s safety.